Many of us have home improvement projects. A little pre-project planning using readily available tools can often avoid mistakes.
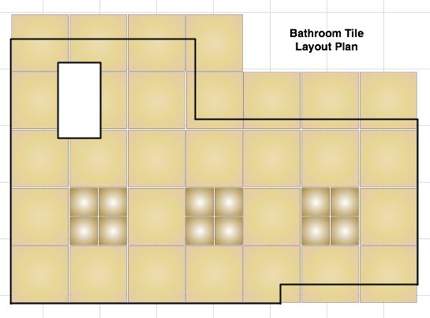
One such project that I’m dealing with is tiling a bathroom floor with a size tile and a combination of 12 inches and 6-inch tiles. To get the placement of the tiles correct and a count of the needed tiles, I decided to use a drawing application to do an initial layout plan.
The drawing application I used was OmniGraffle Pro, but any drawing program which allows you to define ruler and grid scales will work. I selected OmniGraffle because of its simple user interface and my own experience with it. For others wanting an application with this capability, InkScape is a free drawing/design program that provides these same features and is available for Mac OS X, Linux, and Windows.
Below are the steps I used to create my tiling plan. Your steps may differ according to your own project requirements.
Application Grid and Spacing Set-Up:
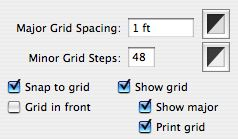
1. I set the ruler scale to one inch is equal to one foot.
2. Major grid spacing to 1 foot.
3. Minor grid spacing/steps to 48 (1/4 inch )
Note: For 48 equal spaces, there would be 47 tick marks. For this particular drawing program, the minor grid/steps are the number of spaces, not the number of tick marks.

Steps for laying out tile patterns for the bathroom:
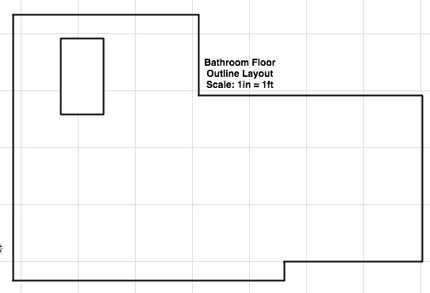
1. Measure the bathroom floor’s exact dimensions and any objects that will need to be tiled around.
2. Transfer the floor measurements to a scale line outline drawing using the above grid and ruler spacings for scale.
3. Created two square template objects, representing a 12-inch tile and the other representing a 6-inch tile. These will be duplicated during the step below.

4. Lay (drag and drop) the tiles over the scaled floor outline, experimenting to find the best and most effective layout. You will be looking for the least tile cutting required, the best visual patterns, and the most effective use of tiles. You can duplicate the above tile templates as needed. Be sure to allow at least 1/4 inch (one minor grid spacing) between the tiles for grouting.

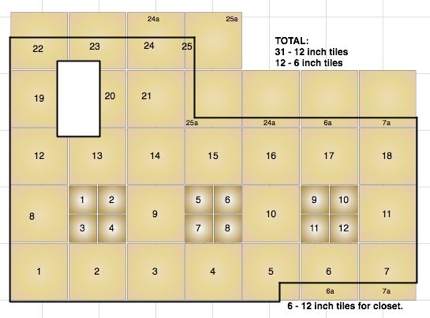
5. Once you have the tiles’ pattern laid out that you like, you can number each tile and the tile cuts/pieces to get the total tiles needed count.
6. This pattern will also serve as a guide to quickly and efficiently tile your floor, hopefully without waste of time or material.
For this “How To” project planning, I used:
Computer: Apple Mac OS X
Application: OmniGraffle Pro
Printer: Minolta Magicolor 2430DL
Other Posts of Related Interests:
Discover more from
Subscribe to get the latest posts sent to your email.


“Floor tile layout” project may give disastrous results if it is not planned properly. We may end up with a totally wasting the tiles. So proper planning using any of the tools is a must. What a Great Story!
I am wondering about the definition of “minor grid steps”. I’m thinking that you might have made a very small error. To divide one foot into 48 equal pieces requires 47 minor division marks. So it is possible that your quarter inch units were actually (12/49)” =.2448″ which is just under 1/4″.
@John E Pearson – Your reasoning is correct. However, since this post is over two years old I can’t be sure it I in fact did it incorrectly or perhaps only made a mistake in writing this post. I can, with certainty, say the floor turned out okay! :-)
I went back to the original drawing program I used (Ommingraffle Pro) and tested the scale again. For this program the “Minor Grid Steps” defines the number of spaces not the number of tick marks, so the setting of 48 is correct.
I’ll make a note/update in this post that for 48 equal spaces there will be 47 tick marks — thanks for the feedback!
thanks so much for sharing this. i am in the process of designing tile for my bathroom shower and this has been amazing at helping me visualize & refine the design.
cheers!!!
Is there a way to visualize the tiles if you are setting them diagonally? I am not a computer wiz but would love to be able to layout a plan with the tiles sitting on the diagonal as opposed to square. Any thoughts? Will this program or Inkscape allow you to do that? I have not downloaded Inkscape as of yet but plan to tonight.
Thank you for your input.
Hi Betty, I believe once you created the appropriate scaled tiles in the drawing program, you could then rotate them 45 degrees allowing a diagonal placement/layout. This should be well within the capabilities of almost any drawing program, certainly Inkscape.
This is a really solid tutorial for using OmniGraffle. We use OmniGraffle to wireframe websites, but we built a script that seems like it would be useful here. It counts up the number of each object that you have in the drawing, which is super helpful for planning and budgeting. In this case you could modify it slightly to count the different kinds of tiles, which would help you know how much to buy. It would be even more useful if you were doing something that was less square and harder to calculate, like if you were trying to rotate the floor plan and have diagonal tiles. (You can download the script from https://www.jtechcommunications.com/blog/blog-detail-12)
What are your thoughts on this? That is a really different application of the script, but it seems to me like it could save you as much time as it saved us.