There are often times when you need to draw, diagram, or flowchart a process or complicated series of events or objects in order to clearly define and make order of the whole picture, and the relationship of each part.
I recently had one of those moments after having completed a home network project. I wanted to not only record the basic layout of the components and computers in my home network but also to record some sensitive ID information and be able to turn it on or off at will. Of course I also wanted it to look nice.
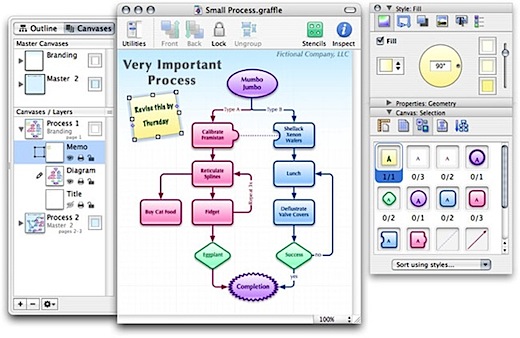
I tackled this project using OmniGraffle Professional 4 from The Omni Group. You might have heard of one of their other applications, OmniOutliner, which I’ve mentioned before. OmniGraffle is a object oriented drawing or diagramming program. I’m not going to try and give you a complete review of the program but just share how I created my home network diagram (below) in less then two hours.
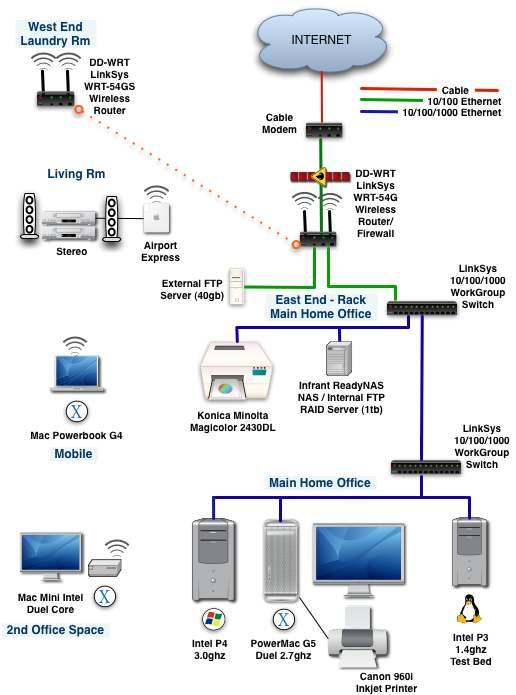
My initial vision for this network diagram was to have the ability to display as much or as little information on the diagram as needed depending upon the immediate use at the time. In order to do this I used the layers function of OmniGraffle. I created four basic layers:
1. Devices – this layer contains the network devices, computers and wiring with no text or descriptions. It’s the bare network only.
2. Names – this layer contains the name and brief description of each device and computer that was diagrammed in Layer 1.
3. Locations – this layer contains the physical location descriptions (Living Rm, West End, Main Office, etc.) display over-layed on Layer 1 & 2 information.
4. Addresses – this layer contains System Names, SSID’s, IP Address, MAC Address, and other technical information. This layer is not displayed in the diagram above due to security and privacy concerns.
OmniGraffle gives you the ability to “turn on” each of these layers independently of the other layers. You can also lock each layer to prevent accidental changing of a layer. This is especially helpful when you are still viewing one layer but working in another.
The devices and network equipment in the network diagram came from Stencils in OmniGraffle. OmniGraffle comes with several stencils and there are more that can be downloaded from The Omni Group site. These stencils made quick work of adding the devices. They also make the finished product look professional. There are in fact many different stencils for a wide variety of subjects, from flow charting, floor plan layouts, gardening, and many others.
OmniGraffle allows grouping, un-grouping, snap to grid, connectors to objects, and moving objects forward or backward in the drawing. These function make quick work of assembling your diagram to the way you want it.
As I said these tools made it possible for me to turn out the above diagram in a little less then two hours. Some could probably do it quicker, but I was well pleased by the results and the ease of using OmniGraffle. There were many features that I didn’t use so I know this application is much more capable then what I’ve relayed here.
Highly Recommended:
How did you make the OmniGraffle stencil for wireless router objects in your network diagram?
From the OG network stencil, I took the switch object, added two vertical lines for antenna, drew the wireless waves, duplicated and placed them above each antenna, grouped everything together…”wireless router” :-)
How did you get the ‘Ethernet bus’ appearance with several things connected to the same point? This is something from Visio that I miss in OmniGraffle. Or have you just got several connecting lines overlying each other?
@John: With the current OmniGraffle Prof. 5.1 you can have multiple objects/things connected (locked) to the same point. However, with the diagram in this post I may have overlaid the lines.
Earl,
Is it possible to make a .graffle file available with your locations and addresses containing bogus information? Did you use OmniGraffle’s data key/value system, or something else entirely?
I currently have all my devices in a spreadsheet with information such as MAC & IP address, connection type, etc., but I think a diagram conveys the information in a much better manner.
@Jason,
I originally used a spreadsheet. I’ve love to have all that detailed information in OmniGraffle but haven’t tackled that process yet.
Hi Earl!
Where did you get the stencils for the diagram? I’m test driving OG 5 and can’t find anything similar to yours. Is it something that was replaced in v5?
I’m disappointed with the stencils for network that OG5 has by default. Graffletopia also has everything from limited copy from Visio or some not so good looking ones.
Nice set of network and computer stencils is what I’m missing at the moment.
Regards,
Alex.
Trying to find the original network stencil that I got with OmniGraffle Pro 4. It had some attractive symbols including the wireless Airport saucers, wifi images, etc. Used it all the time for the blue clouds and now I have managed to lose it.
Only interested in the original stencil. I see the ones on Graffletopia, not there.
Anyone?